Stunning And Easy Drawing Of A Rose: A Beginner's Guide
So, you've decided to dip your toes into the world of art by learning how to draw roses? Great move! Roses are not just stunning flowers; they're also a timeless symbol of love, beauty, and elegance. Whether you're a complete beginner or someone looking to refine their skills, this guide will walk you through every step to create an easy yet breathtaking rose drawing. And guess what? You don’t need to be a professional artist to pull this off!
Now, before we dive deep into the nitty-gritty details, let me tell you something cool. Drawing roses is actually easier than it seems. Sure, it might look intimidating at first glance, but with the right techniques and a bit of patience, you'll be amazed at how quickly you can create a masterpiece. Plus, who doesn’t love the satisfaction of seeing their own artwork come to life?
One of the best things about learning how to draw roses is that it doesn’t require any fancy tools. All you need is a pencil, paper, and maybe an eraser. And if you're feeling extra fancy, you can add some colors later on. But let’s not get ahead of ourselves. First things first: let’s break down the process step by step so you can master this stunning and easy drawing of a rose.
- Unveiling The Legacy Of The Air Jordan 4 Tag A Sneaker Icon
- Softail Bobber A Timeless Icon Of Custom Motorcycle Design
Why Drawing a Rose is Perfect for Beginners
Let’s face it—roses are iconic. They’re everywhere, from wedding bouquets to romantic movies. But did you know that roses are also one of the most beginner-friendly subjects in the art world? Here’s why:
- Roses have a simple structure that’s easy to break down into basic shapes.
- You don’t need to worry about intricate details right away. Start with the basics and build from there.
- It’s a great way to practice shading, texture, and symmetry—all essential skills for any aspiring artist.
Plus, there’s something therapeutic about drawing roses. It’s like meditating with a pencil in your hand. So, if you’re ready to unleash your inner artist, let’s get started!
Tools You’ll Need for Your Easy Rose Drawing
Before we dive into the actual drawing process, let’s talk about the tools you’ll need. Don’t worry; you don’t have to go broke buying expensive art supplies. Here’s what you’ll need:
- Camillaxaraujo The Rising Star In Digital Content Creation
- 7 Movierulz Kannada Your Ultimate Guide To Understanding And Staying Safe
- A good old pencil (HB or 2B works great for beginners).
- A clean sheet of paper. Regular printer paper will do just fine.
- An eraser. Mistakes happen, and that’s okay! Just erase and try again.
- Optional: colored pencils or markers if you want to add some color to your masterpiece.
That’s it! No fancy brushes, no expensive paints. Just the basics. Now, let’s move on to the fun part—the drawing itself.
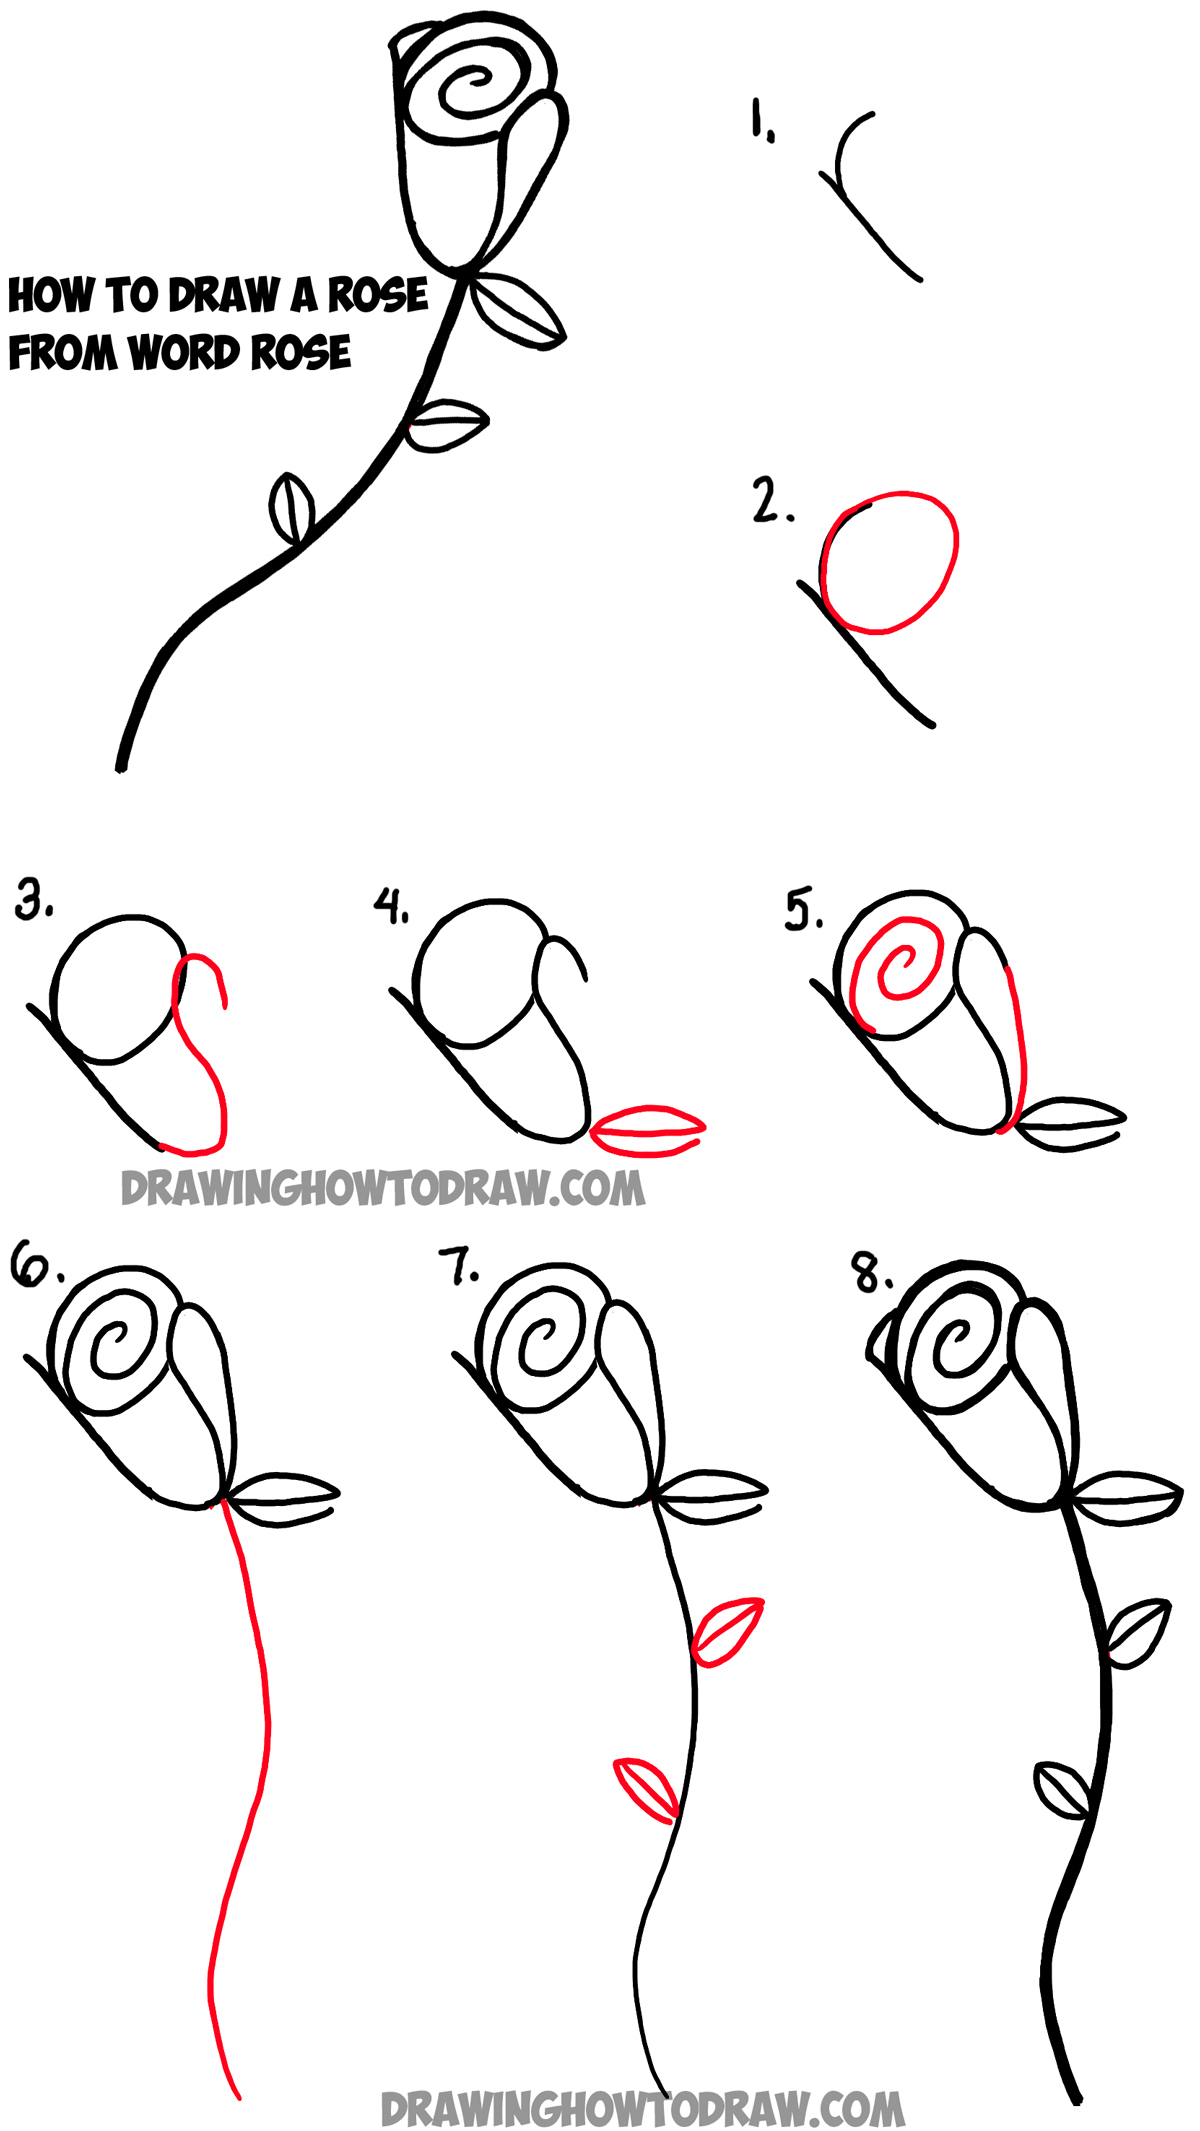
Step-by-Step Guide to Drawing a Stunning Rose
Alright, let’s break it down step by step. This is where the magic happens. Follow these steps, and you’ll have a beautiful rose drawing in no time.
Step 1: Start with the Basic Shapes
Every great artwork starts with basic shapes. For your rose, begin by drawing a small oval in the center. This will be the heart of your rose. Next, draw a larger oval around it to form the outer petals. Don’t worry if it’s not perfect—no rose in nature is perfectly symmetrical!
Step 2: Add the Petals
Now it’s time to give your rose some personality. Start adding petals around the center oval. Think of them as little teardrop shapes. Layer them one by one, overlapping each other to create depth. This is where you can let your creativity shine. Some petals can be bigger, some smaller—it’s all about creating a natural look.
Step 3: Sketch the Stem and Leaves
Once you’ve got the petals sorted, it’s time to give your rose a home. Draw a long, curved line for the stem. Then, add some leaves on either side. Leaves are pretty straightforward—just draw a teardrop shape with a jagged edge. Easy peasy!
Step 4: Refine Your Lines
Now that you’ve got the basic structure down, it’s time to clean things up. Erase any unnecessary guidelines and refine your lines. Make sure your petals look soft and natural. This is where you can add a bit of detail to make your rose pop.
Step 5: Add Shading and Texture
This is the fun part! Use your pencil to add shading to your rose. Focus on the areas where the petals overlap to create depth. You can also add some texture to the petals by lightly sketching small lines. This will make your rose look more realistic.
Tips and Tricks for a Stunning Rose Drawing
Here are a few tips to help you take your rose drawing to the next level:
- Study real roses. Look at their shapes, textures, and how the light hits them. This will give you a better understanding of how to recreate them on paper.
- Practice makes perfect. Don’t get discouraged if your first attempt doesn’t turn out exactly as you imagined. Keep practicing, and you’ll see improvement with every try.
- Experiment with different shading techniques. Try cross-hatching, stippling, or blending to see what works best for you.
Remember, there’s no right or wrong way to draw a rose. The most important thing is to have fun and express yourself through your art.
Common Mistakes to Avoid
Even the best artists make mistakes sometimes. Here are a few common pitfalls to watch out for:
- Overworking the details. It’s easy to get carried away with adding too much detail, but sometimes less is more. Let the natural beauty of the rose shine through.
- Ignoring proportions. Make sure your petals, stem, and leaves are in proportion to each other. A rose with a huge stem and tiny petals won’t look quite right.
- Forgetting to erase guidelines. Those initial shapes are just there to guide you. Once you’ve refined your drawing, make sure to erase them so your final piece looks clean and polished.
By avoiding these common mistakes, you’ll be well on your way to creating a stunning rose drawing.
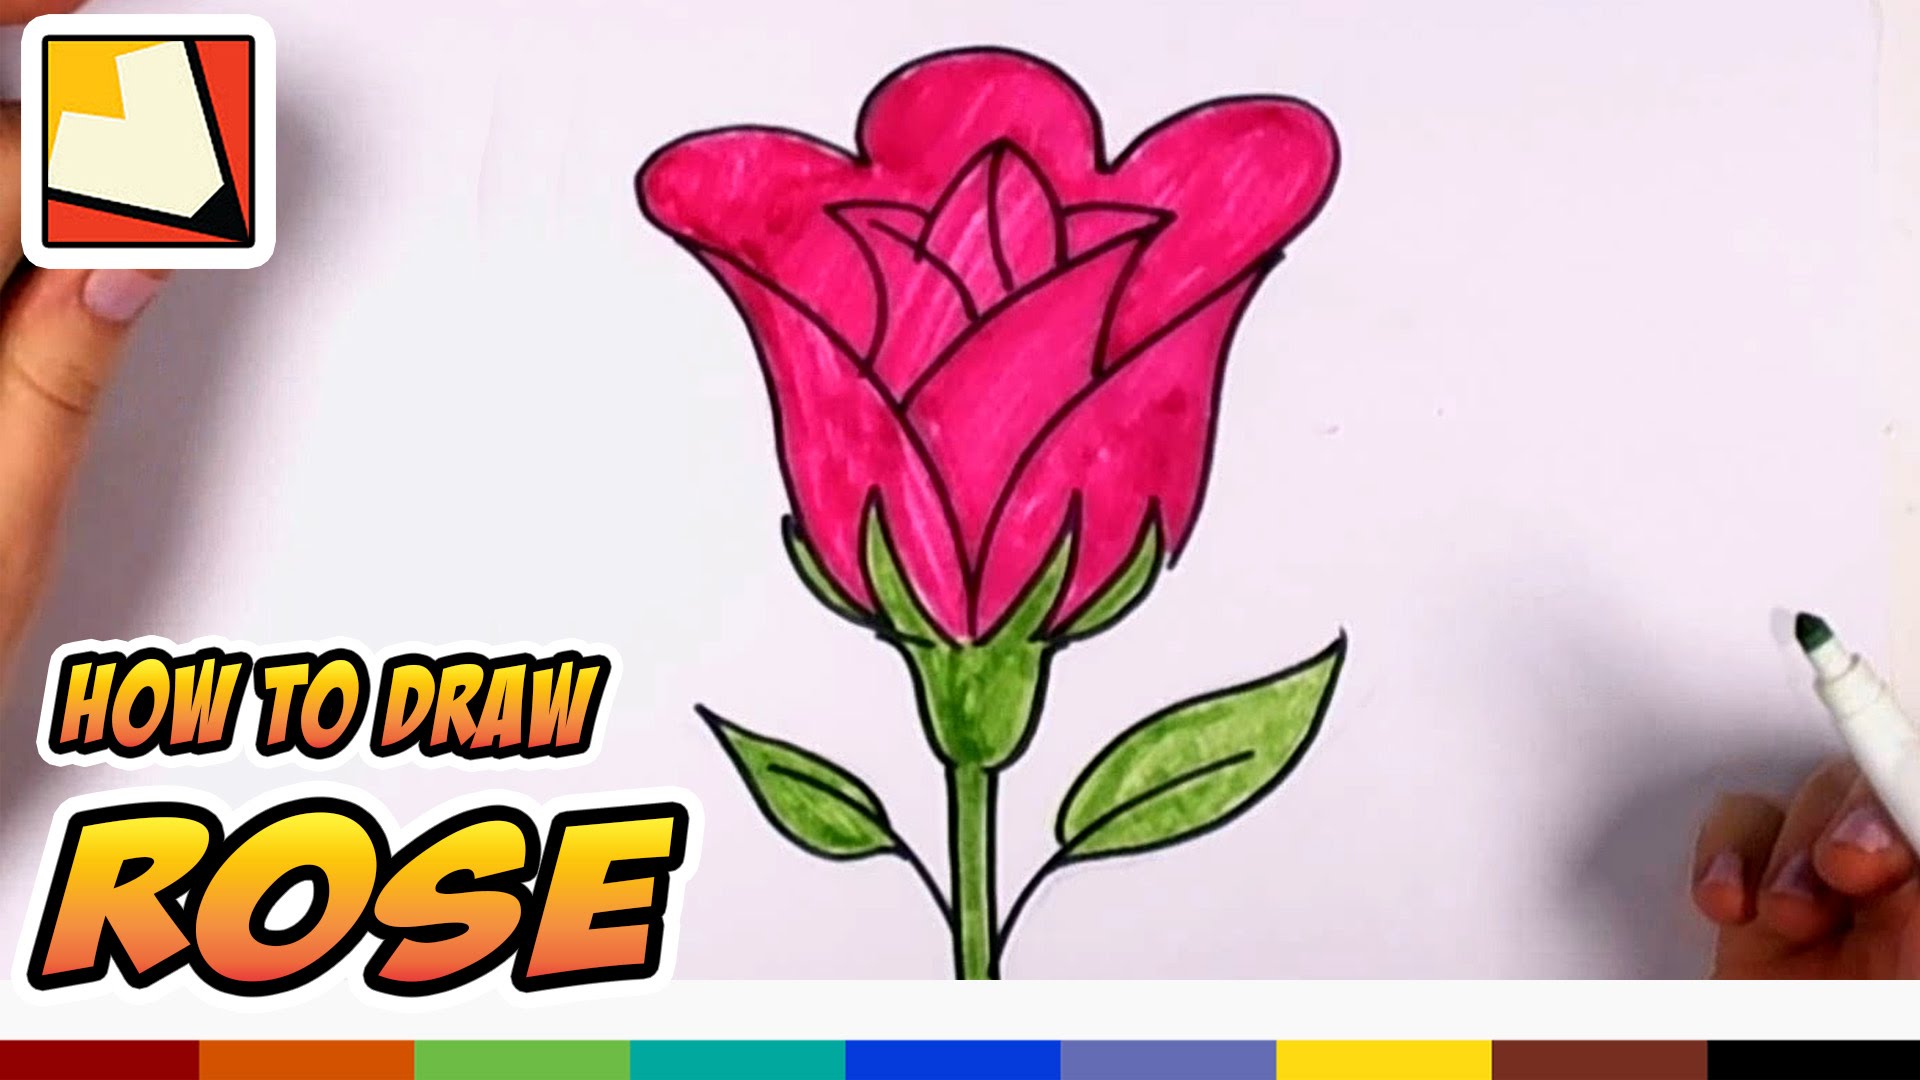
Adding Color to Your Rose Drawing
Once you’ve mastered the basic pencil sketch, it’s time to bring your rose to life with color. Here’s how:
Choosing the Right Colors
Roses come in a variety of colors, so the choice is yours. Do you want a classic red rose, a soft pink one, or maybe even a bold yellow? Choose colors that inspire you and match the mood you want to convey.
Coloring Techniques
When it comes to coloring, there are a few techniques you can use:
- Layering: Build up colors gradually to create depth and dimension.
- Blending: Use blending tools or your fingers to smooth out transitions between colors.
- Highlighting: Add highlights to areas where the light hits the rose to make it pop.
Experiment with different techniques to find what works best for you. And remember, there’s no right or wrong way to color your rose. It’s all about expressing your creativity!
Exploring Different Styles of Rose Drawings
Now that you’ve mastered the basics, why not explore different styles of rose drawings? Here are a few ideas to get you started:
Realistic Style
For those who love detail, try creating a realistic rose drawing. Study the textures and shadows of real roses to bring your artwork to life.
Cartoon Style
Want something a bit more playful? Try drawing a cartoon-style rose. Exaggerate the features and add some fun details like happy faces or quirky stems.
Abstract Style
If you’re feeling adventurous, try an abstract rose drawing. Play with shapes, colors, and patterns to create a unique piece of art that’s all your own.
The possibilities are endless. Let your imagination run wild and see where it takes you!
Conclusion: Your Stunning Rose Drawing Journey
And there you have it—a complete guide to creating a stunning and easy drawing of a rose. Whether you’re a beginner or someone looking to refine their skills, this guide has everything you need to get started. Remember, the key to success is practice and patience. Don’t be afraid to make mistakes—they’re all part of the learning process.
So, what are you waiting for? Grab your pencil, paper, and let your creativity bloom. And don’t forget to share your masterpiece with the world! Whether it’s on social media, in a gallery, or just on your fridge, your art deserves to be seen. Happy drawing!
Table of Contents
- Why Drawing a Rose is Perfect for Beginners
- Tools You’ll Need for Your Easy Rose Drawing
- Step-by-Step Guide to Drawing a Stunning Rose
- Tips and Tricks for a Stunning Rose Drawing
- Common Mistakes to Avoid
- Adding Color to Your Rose Drawing
- Exploring Different Styles of Rose Drawings
- Realistic Style
- Cartoon Style
- Abstract Style
- Hub Movie 4u Your Ultimate Destination For Movie Entertainment
- One Tree Hill Larry Sawyer A Deep Dive Into His Character Legacy And Impact

How to Draw a Red Rose Step by Step Guide
Rose Drawing Steps Beginners at Explore collection
Rose For Beginners Drawing at Free for personal use
